In the morning we met some friends and the kids had fun at the park, although it did start to rain. That shortened their running around time for sure.
In the afternoon I worked on taking apart the MC2 pixel purse and getting it working with an arduino. I was able to get up and running pretty quickly with some default code from adafruit.

 Today I finally upgraded the snail mail notifier we've been using since 2012. The original setup (on the left) involved an Arduino Uno, ethernet shield, and a TPLink-701 router modified to run OpenWrt. There were wifi alternatives, but they were expensive at the time and this was a cheaper solution.

This newer version (on the right) involves just an Adafruit Feather HUZZAH with ESP8266 which is a board with built in wifi. Adafruit's Feather boards are arduino-compatible, so the changes in code were minor to account for the different wifi chipset.  
Chris wanted to keep the original box even though the device footprint is much smaller. Quinn helped by typing on his computer and playing with some switches I set up for him to toggle. He had a lot of fun, and now we have a smaller and less power hungry device for mail notifications.

I've been dragging my feet getting the drivers set up on my new laptop (which isn't exactly new anymore). But I finally installed all of the necessary Arduino drivers so I can begin setting up some mini projects more easily.

Now to find a few hours as a chunk to work on a project....

Soldered a few projects I'd like to get completed for the Grand Rapids Comic Con. It was fun to spend the evening working on that and finally having everything come together. Adafruit makes such lovely hardware and their tutorials online are fantastic!

It's a pretty heavy arduino week this week but man, I'm on a roll. So I started testing something I'm thinking of putting together for Grand Rapids Comic Con.

A part I ordered earlier this week came so I did some soldering this evening. Now with everything wired up I can start programming this adorable 8x8 multi-color (red, yellow, green) LED matrix.

Sewing with conductive thread is kind of tricky since it feels a lot like sewing with wire. But it's good practice I suppose, since I have several projects I'd like to work on with that thread.

Spent a little more time this evening with the arduino-compatible gemma and tweaking some code.

This evening with E3 going on I watched the Sony press conference and played a little with an adafruit gemma I've had for a few years. It's been awhile since I've played with an arduino but now that I'm getting more and more free time back in the evening, it's time to start on some projects.

Ok, not really. But I did manage to break the snail mail notifier. More specifically, I messed up the 703N router in the box. We upgraded the wifi last night, including finally updating the security since we've gotten rid of some legacy devices.

So I got into the one in Quinn's room (that had been a backup wifi router) and made the changes no problem. Confident that I knew what to do, I went into the one for the snail mail notifier. And somehow in my rush to get it done in between Quinn crying for attention, I locked myself out of the box.

So now the mail notifier is broken. Along with the pinoccio I was going to set up (that worked right before Quinn was born!).

All before 9am. Today is an annoying day.

The Pinoccio I backed on indiegogo last year has arrived! It's a cute little microcontroller (arduino compatible) with built in battery and wifi.
Of course, the device took so long to arrive (it was supposed to originally ship last Summer) that I ended up doing a work around for what I had intended this little things for. So now to come up with a project!

Chris suggested something with the hue lights and a button, so maybe I'll make these into tiny remotes.

We both had a shortened day at work today, so I spent part of the afternoon tinkering with an arduino and a proximity sensor. I haven't tested it yet, but I should test the proximity sensor with the cat. The ultrasonic device I have doesn't work to well detecting his movements, no doubt because of his fur. I'm thinking this might work better.

Maybe I'll build a device that buzzes at him every time he jumps on the counter. I know he does it as soon as we leave for work, the stinker.

The RFduino kickstarter I backed earlier this year arrived, and they're adorably tiny! Basically they're shrunk-down arduino and arduino shields, and bluetooth 4.0 enabled.
The actual arduino isn't much larger than a quarter, as you can see.

I look forward to getting these programmed and deployed in the house!

I waited until the last minute so I didn't have much time to improve on the Haunted Pumpkin from last year. All I really did was add the wave shield I'd soldered earlier this year to the project.

For the most part, that meant the pumpkin functioned virtually the same: there were was an arduino in the pumkin, two LEDs (one to simulate a candle flicker, one to be scary red), and Chris's scary voice to scare children.
I mostly just had to move wiring around since the wave shield uses some pins I used last year.

Because I was short on time, I didn't have time to really edit the code and make it very pretty. I mostly just copied the Adafruit example file from the Wave Library into my existing project. It's pretty messy, but it worked. I'll have to spend some time and tweak it so it works a little better next year.

But it worked! And that's the most important thing!

Github files: Haunted Pumpkin With Wave Shield


Adafruit has a tiny, adorable microcontroller, Gemma. I ordered one as soon as it was available and it finally arrived today, as well as some neopixels.
After some issues getting my Windows machine to run the drivers (Windows 7 is very angry about non-digitally signed drivers), I was finally up and running with a few neopixels daisy chained, rotating colors.

I have one project lined up for the little gemma, but at such a cheap price I'm really looking forward to integrating more into other things.

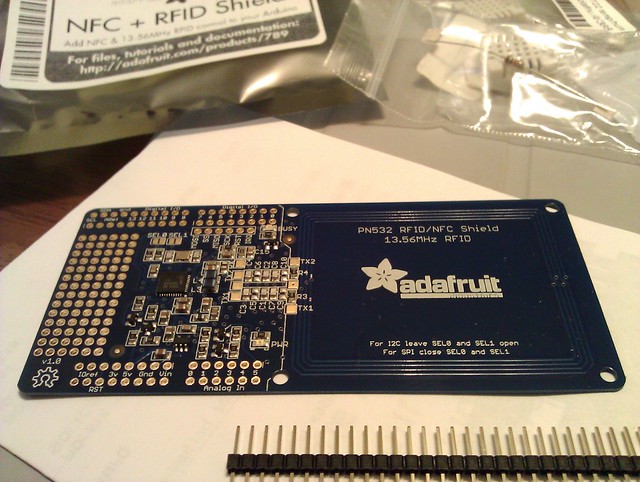
Awhile back I purchased the NFC/RFID shield from adafruit. I was pretty excited when it arrived (and I still am) but I just haven't been able to come up with a project.

Today I decided to sit down and just play with it. I watched a few of their video tutorials and started playing with it.
In my confusion, I programmed the card as an NDEF card. This means that my new phone can read it since it supports NFC. That's exciting! But it also means that whatever I wrote to it is on the card for good. Arduino support is limited and that means no loading different information on the card. Since I had not changed any of the default settings in the program, I now had a card that loaded adafruit.com anytime something read it. Oops.
Luckily I found a forum post that suggested downloading an Android application called NXP TagWriter, which allows reading and writing of NDEF items. Since I was no longer able to write to the card using the arduino NFC/RFID shield, I decided to give it a go.
The application gives you a list of different formats that are supported. The card I have is MiFare card, so I was good to go.
I decided to change the card from the default I'd set with the arduino to Chris's blog. As you can see above, success!

I'll have to play around and find out what exactly I want the card to do. It can be programmed to send a contact card, phone numbers, bluetooth information, URLs, launch an application and more.

I also ordered a few more MiFare cards from adafruit so I can continue to play with the arduino shield and this time I wont accidentally program the card as an NDEF.

A lot of components for arduino projects have arrived in the last few days. This is the last of them for awhile. An RFID & NFC shield. It came with a programmable card and if I really enjoy the project I make with this and want to add some additional cards, Adafruit has a nice assortment to choose from.

I don't have a phone that supports NFC so while it's a fun idea, it's not really anything I'm going to play with immediately. The RFID though, that is what I'm interested in.

I'll have to spend some time and get this hooked up to an arduino and an ethernet shield soon.

I played just a little bit with the stepper motor and servos that arrived yesterday in the mail. I mostly just wanted to confirm everything was working properly.
Both the stepper motor and the servo motors worked just fine.

I think I may try to hook a laser pointer up to one of the small servos and have it move back and forth a little, to mess with the cat. Something probably similar to this instructable, but probably not as involved.

A few months ago I listened to this Making Arduino Controlled Robots webcast and eventually a small robot is what I'd like to make.
I also, on a whim, thought about testing an IR receiver I picked up awhile back. I'd like to use it to control a cool color-changing remote controlled cloud lamp I saw on instructable.

Lucky for me, I found a recently posted tutorial that used both the LED segment and the IR receiver I have. So I just wired everything up and used the example sketch. Both items were tested and working in a matter of moments.

I love when things go quickly and easily.

For Halloween last year I had a heck of a time trying to get sound out of the Arduino without a wave shield. There were a few other alternatives but I eventually ended up using a custom PCM library to get the sound I needed. Still, a wave shield would make future projects a lot easier. Just plug in speakers and go.

So I bought a wave shield and, similar to the shield last week, it came unassembled.
The whole assembly was pretty quick. I'm really enjoying soldering. It's like assembling a metal Lego set!
And, just like it should, it plays WAV files off of the SD card plugged into it. I look forward to using it in a future project!

I've had these OpenSource RF wireless arduino shields for awhile with the intent of logging temperature differences throughout the house. Admittedly, I've been dragging my feet getting things set up. With cooler weather, however, I've been motivated time to poke around and get things set up.
I used the Adafruit DHT11 library and source code to log the temperature. The whole DHT11 tutorial, including a wiring diagram, can be found here. The basic setup is pretty easy.

Note: You cannot upload a sketch to the arduino if the serial switch is on the RF wireless shield is ON

Once I got the shields communicating with one another, I install pySerial. It's a module that allows python to read from the serial port, which is what the arduino is sending data through.
Next I wrote a small python script to read the data from the arduino and write it to a CSV file. The intent is to eventually graph the data and watch trends over time.

At first I had some issues with data being clipped while reading from the two arduinos. Originally the arduinos were just blasting the data and I had the python script set up to catch it. That didn't work 100% every time so I had to come up with another solution.
I modified my approach by having each arduino sit patiently waiting to hear something. I then set up python to send a specific message to each arduino. Since they're each set up for a different specific character, there should be no conflict with with messages being sent.

So once an arduino receives it's specific message, it repsonds with the humidity and temperature. The python script then logs the data in a CSV file.

Once I felt comfortable with how the python script was working, I placed two arduinos around the house.
Then I hooked up the Wireless RF USB dongle that I came with the arduino shields to the Raspberry Pi. It took a moment to figure out the tty assignment in Linux. Here's what I did.

Determining tty assignment for RF USB dongle in Linux:
  • go to dev folder (type cd /dev at the command line)
  • type ls and read the list. There should be a ttyUSB0
    • If you're unsure you can always unplug the device and run ls again in the /dev folder
Once I had the assignment figured out, I updated the python script with the path to the USB dongle.

Since I want the data to log automatically at certain intervals, decided to use cron. I did had some issues getting a python script to execute properly from a cron job on the Raspberry Pi, so instead I created a shell script to execute the python script. I'm not entirely sure why python partially executes in cron, but for now this work around is solves the problem.

Overall the system has been working pretty good for the last week. The next step is to set up automatic data graphing. I've had some minor success, but I'm not 100% sure how I want to proceed quite yet.

If you're interested, I've tossed everything up on github.

Download:
Software Requirements:
Materials Used: